Some Sump Basics
Simply worded, a sump is just a secondary tank that is set-up and linked into a main / display tank as an option for placing equipment as well as providing filtration for the main tank.
If I have learned anything in this hobby it is that there are many many different ways to achieve a healthy and thriving tank. This could not be any truer with how you choose to set up a sump. Likely the best way to approach this topic is to describe the factors that I learned which go into designing your sump and then show you how I set up my sump just as one example. I hope you will find these sump basics helpful.
Why do some hobbyist use sumps ?
Some people would not have a marine tank without a sump while others fell they are not required. Although it can be debated whether or not a sump is required, there are some benefits to having a sump such as:
- Increased total water volume – This is one of the biggest benefits in my opinion. The larger amount of water you have, the more stable your water parameters can become. It can also be a little easier to control and help to avoid the buildup of nitrates and phosphates with a larger water volume.
- Increased Flow – Although the main purpose of most sumps is to purify/filter the water, the return pump in the sump will be moving water into the main tank creating some water flow. This additional flow can be used to help to create a healthier environment in the main tank.
- Hiding Equipment – If you place your sump out of sight (in the stand for example) all of the equipment such as protein skimmers, heaters, and media reactors (just to name some) can now be out of your display tank and hidden in the sump. I personally like the look of a tank with as little equipment in it as possible.
- Maintaining your water level – As the water evaporates from the set-up, the water level in the display tank will not change. The reduced water level will occur in the last compartment of the sump allowing you to top up for evaporation without affecting the main tank. You can also have the option for additional equipment such as an auto top-off system to control and maintain a consistent water level and salinity.
- Stabilizing your PH – If you have a refugium or live rock compartment with some algae, you can set up sump lighting to come on while the main tank lights are off. This allows for the photosynthesis process to continue in the sump when it stops in the main tank which controls the CO2 levels that typically affect the PH when all the main lights are out.
- Safer Supplement Dosing – Having a sump allows you to add any supplements to the water in the sump and becoming mixed with the tank water before reaching the display tank. It also provides a safer way to top-up with fresh water for evaporation.
- Increased Oxygenation – As water from the main tank enters into the drain line, air is pulled into the drain line with the water and mixes together, adding more oxygen and releasing some CO2.
- Less Equipment Size Limitations – On larger tanks, starting around 150 gallons, it becomes more and more difficult to find equipment that can be used without a sump. Equipment like media reactors and skimmers for larger tanks typically have to be modified to work as HOB ( hang on back ) equipment, assuming they can be modified.
- Food Source for the display tank – Sumps can be set-up to provide a safe place for pods and other little forms of marine life to grow without the threat of predators. These little life forms will find their way to the return pump and sent off into the display tank were they will become a food source for fish, inverts and corals.
- Easy Water Changes – If the water volume in your sump design allows for this, you can complete weekly water by removing the water from your sump and replacing the water back into your sump. This will result in less disruption and/or stress to your fish and corals in your main tank.
Are there any drawbacks ?
In short, there can be. Most of the potential drawbacks can be avoided if you understand them and plan your sump to avoid them. These potential drawbacks can be:
- Large high flow pumps can result in placing micro bubbles in your main tank.
- More equipment added to your overall set-up can add extra sources of heat into your water.
- Larger return pumps do consume extra energy.
- Sumps inside a stand can give you a very cramped area to work in.
- Using some siphon based drains for your sump can leave you at risk of the drain stopping should you lose power.
If you have decided you want a sump after carefully considering the pros and cons, you are going to want to plan the sump as best you can.
Step 1: The first thing you want to do is decide what you want to use your sump for ?
- Holding Equipment
You can keep almost any type of equipment you want use on you set-up in the sump. Possible equipment to keep there could be: skimmer, heater, media reactors, or calcium reactors just to mention a few possible options.
- Biological Filtration (and what type of filtration)
This could include different types of biological filtration such as: bio-balls, ceramic rings (bio-max), or live rock. Each of these options have many different pros and cons so you should really do your homework first on choosing what type of biological filtration you will use (if any) in your sump.
- Mechanical Filtration (and what type of filtration)
Once again, many options to consider such as: filter socks, filter floss, or sponges. Each option requires a few little modifications to your design to allow for mechanical filtration if you choose to use this option in your sump
- Chemical Filtration (and what type of filtration)
You can consider using: carbon, phosphate removers, or nitrate removers, in your sump just to name a few. You can use this passively (just placing it in there and allowing water to flow over it) or actively in a media reactor.
- Refugium
When it comes to a refugium, they can have many different purposes, but they will all have one thing in common. As an over simplified definition of what a refugium is, it is a refuge from predators. You can grow pods, macro algae, or keep fish in a refugium keeping them safe from threads of other fish or inverts. As mentioned before, you can place the refugium lighting on a reverse cycle to your tank light to help stabilize your PH. Refugiums are a topic best left to discuss on their own.
- Or a combination of the above
Most people make their choices of the above based on many different factors. Most of these choices are based on the type of set-up they want to have.
There are many other articles here that cover more details about filtration and equipment options
Step Two: plan your layout
Just a few rules of thumb that I have found to be helpful:
- Use the largest sized sump you can fit and afford.
- You can use a second hand tank to make a sump in order to save money
- If you make your own sump, do not try to attach acrylic sheets to a glass tank.
- If you make your own sump with a glass tank and glass baffles, make sure you use aquarium safe silicone.
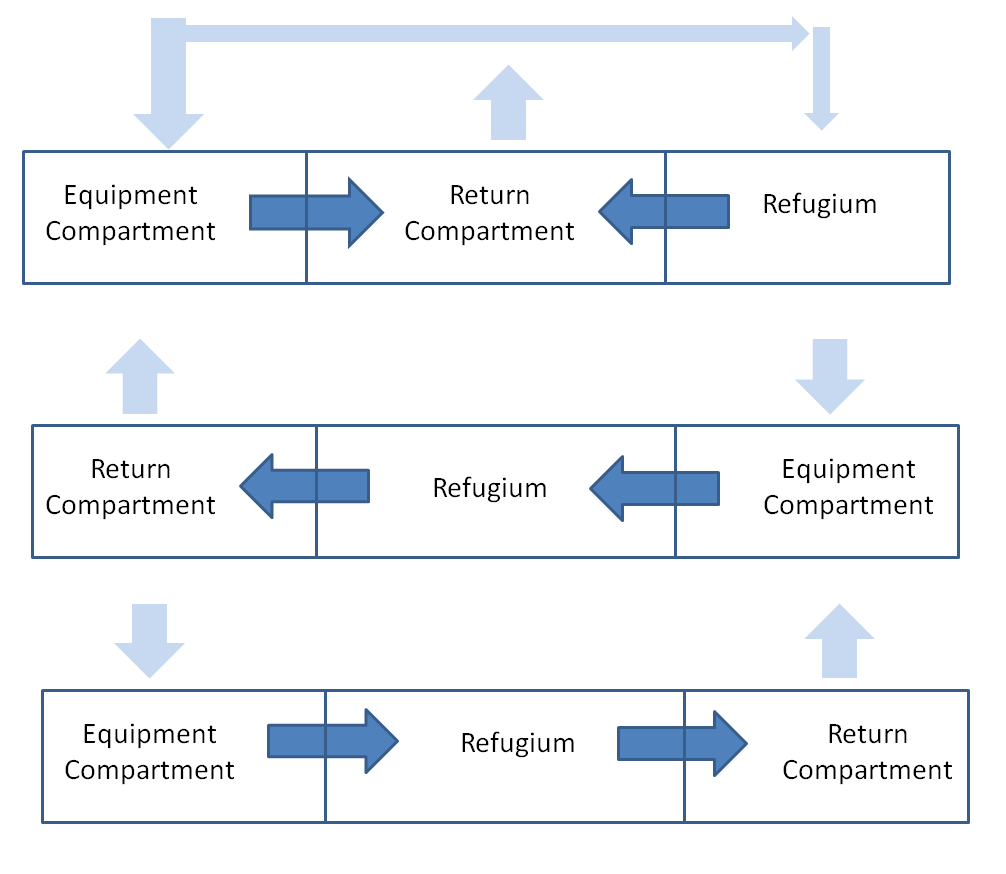
The below picture outlines the three more common approaches planning the layout of your sump. You can choose almost any layout depending on where you want you drain and return lines in you main tank.
Step Three: plan your flow rates
This one likely one of the more debated aspects when it comes to setting up your sump. However, I would say the flow rates of your sump should be based on a few factors.
Refugium –if you have a refugium, you will most likely want a lower flow rate to allow for: natural nitrate removal, accommodate some marine life, or a combination of both. This is the main reason for the layout in the top pic of the above. This way, you can have two different flow rates in the sump, one for the refugium and a second for the equipment and return pump compartment.
Skimmer – most people also match the flow rates of the sump to match the flow rate of their in sump skimmer. This allows for the best performance from your skimmer.
Rule of thumb – some people just go with a 10X main tank volume as there flow rate and then adjust from there.
Step Four: Planning the compartments
Before talking about the compartments, it first might be a good idea to talk about the baffles and bubble traps.
Think of baffles as walls or dividers in your sump that will both separate your compartments, and be used to set the water levels in each compartment. Two baffles used together can also help to direct the flow in your sump compartment moving from top to bottom (or bottom to top) to help circulate the water through more of the compartment. A bubble trap is just three baffles used one after the other to change the direction of the flow three times to help eliminate micro bubbles in the sump’s water. You would typical want to use a bubble trap to eliminate micro bubbles from getting into compartments were they would have a negative effect on any equipment in that compartment. Skimmers and return pumps typically do not perform well with micro bubbles in the water. As a rule of thumb, baffles need to be spaced one inch apart and one inch from the bottom to allow for strong flow rates as well as maintaining a relatively small spacing to help eliminate micro bubbles.

The first step is to determine were you will place your sump after it is set-up so you will have an idea of any potential size limitations. If the sump will be placed in a tank stand, you will have to double check for any height limitations as well. Next I would suggest that after you have planned what the purpose of your sump and the equipment you want, you should actually purchase all of the equipment before completing the sump. Once you have all of your equipment and you can assemble the equipment to confirm how much space will be required for your compartments.
You can now decide if you want to purchase a preassembled sump or purchase a standard sized aquarium that you can make into your sump.
Step Five: Build the Sump and plumb it to the tank
If you have purchased a pre-assembled sump, then you likely will not need to assemble / install any baffles or bubble traps. If you are using a standard sized aquarium, then you will have to install baffles. I would suggest that you first place all of your equipment inside the sump and space it out to where you want it. Now you can use a non permanent marker to mark were your baffles should go. You can also now plan how tall the baffles should be based on the requirements of your equipment (mainly your skimmer) which require a certain depth of water to work in. You will also want to base the height of your baffles to leave enough space in your tank to accept any potential drain back from your main tank in the event of a power failure (this is explained in more detail in my example at the end of this article)
Remove the equipment and carefully measure and mark were your panels will go. You can now purchase glass cut to the size you need and silicone the baffles in place. You will also want to Make sure you space the baffles at least one inch apart.
As for plumbing the sump to your tank, the below article here contains a lot of helpful information on how to plumb a sump and tank together.
https://reefaquarium.com/2012/aquarium-plumbing-basics/
Step 6: test
Put it all together and then run the set-up for a while to make sure everything works they way you planned it. The following is an example of how I did the sump in my last reef tank set-up. This is my preferred way to set-up a sump. Hopefully it will give you some ideas on how to set-up yours
My example of how I applied these sump basics in one of my aquariums with a sump
Step – 1
I first decided how big my sump would be. I wanted the biggest one that I could fit in a stand under my display tank. As my display tank is 4’ X 2’ X 2’, I determined the biggest sump I could fit inside the stand would be a standard 55 gallon tank.
Step -2
I next decided what I wanted to use the sump for. I know I wanted a live rock compartment as large as I could make it. I also wanted to have a skimmer in the sump, two heaters, and still leave room for at least one reactor. I also left it would be important to have a little extra room should I want a second reactor or other equipment latter on. As I wanted as large of a compartment for live rock as I could make, I decided I would set the drain line to flow into that compartment and use a filter sock to catch all the crud along with getting rid of any micro bubbles that would be created by the drain line.
Step -3
Next I determined how much drain back I would get from the display tank, should the power go out. The display tank is drilled with an internal overflow for the drain. I prefer to use a durso stand pipe in a internal overflow as a drain into the sump as this is the easiest way (IMO) to set-up a drain which can not cause any potential problems should the return pump stop working (like during a power failure). The return line is drilled on the back glass 3 inches from the top of the tank.

To calculate the drain back from the display tank, I took the lowest point of the tank between the top of the internal overflow and the hole drilled for the return line in the back of the tank. The lower of the two was the return line which was 3” from the top of the tank. Using that lower measurement, I was able validate I would get 15 gallons of drain back using the below website:
http://reef.diesyst.com/volcalc/volcalc.html
As an alternative to the above thread, you can also calculate the volume by using the below formula. Keep in mind; it will be about 95 to 98% accurate (IMO). You input the tank (or tank space) dimension using inches and the calculated outcome is in US gallons.
(Length X Width X Height) / 231 = tank volume in gallons
(48 X 24 X 3) / 231 = 14.96 gallons
So now I know I have to leave enough space in the sump of 15 gallons of water
Step – 4
I next planned my flow rates. I set my goal of as close to 10X the display tank volume as I could get. I chose that flow rate based on a few different factors. I knew what skimmer I would be purchasing for the sump so I knew it had a flow rate of 800 to 1000 GPH (gallons per hour) so I wanted the flow to be at least within that range but a little higher would still be OK as well (IMO). I also wanted to have the return pump move as much water in the tank as practical and that nothing that I was planning to use my sump for would need a specific or lower flow rate. I chose the goal of between 1000 and 1200 GPH. That worked out to approx 10 X flow.
The only compartment that I wanted a different flow rate in was the live rock compartment as I wanted an even higher flow rate in there to maximize the biological filtration from the live rock. It was easier for me to add a power head to that compartment to increase the flow without impacting the rest of the sump set-up while still keep my design as simple as possible.
Once I knew the flow I wanted, I planned my plumbing set-up to ensure the plumbing will allow for this flow rate and to determine the correct sized return pump to get that flow through the sump. I used the information in the below article to do that:
https://reefaquarium.com/2012/aquarium-plumbing-basics/
Step – 5
The next step for me was to purchase the equipment I was planning to put in my sump. Once I had all of the equipment purchased, I placed them in the sump so I could plan out the size of the compartments and marked were the baffles should be. I also wanted a bubble trap just before the skimmer to get rid of any micro bubbles which the drain line might produce. By doing this I was able to determine the length of each compartment. Next step was to determine the height of the compartments. Using the same formula as listed before, I sized each compartment so the total volume of water in the tank would be no more than 40 gallons to allow the drain back from the tank should the return pump stop working.

Note: The above diagram is not to scale
I could also build my tank stand now as I had the details of the sump so I could make sure everything will fit in the stand and still leave me some room to get at all the equipment without running into any difficulties.
Step – 6
Now that I know how large and tall I wanted each compartment to be, I ordered some pcs of glass to make the baffles and siliconed them in the sump. I spaced the baffles 1 inch apart and made sure the baffles used to direct the water flow down were no less than 1 inch from the bottom of the tanks (closer to 2 inches actually).


Once the silicone had at least 24 hours to cure, I placed the sump in the stand. I hooked up the plumbing and return pump, and tested the set-up with fresh water. When testing everything, I first checked for any leaks. I found and fixed one small leak as I did not tighten one bulk-head flange enough. The most important test was cutting the power to the return pump to make sure the sump would hold all the water that drained back, and that the system would return back to normal once the power failed. Every worked as planned.
Now that I had everything working as I had planned it, I drained the fresh water out of the tank, filled it with mixed salt water, and cycled/stocked that tank from there.
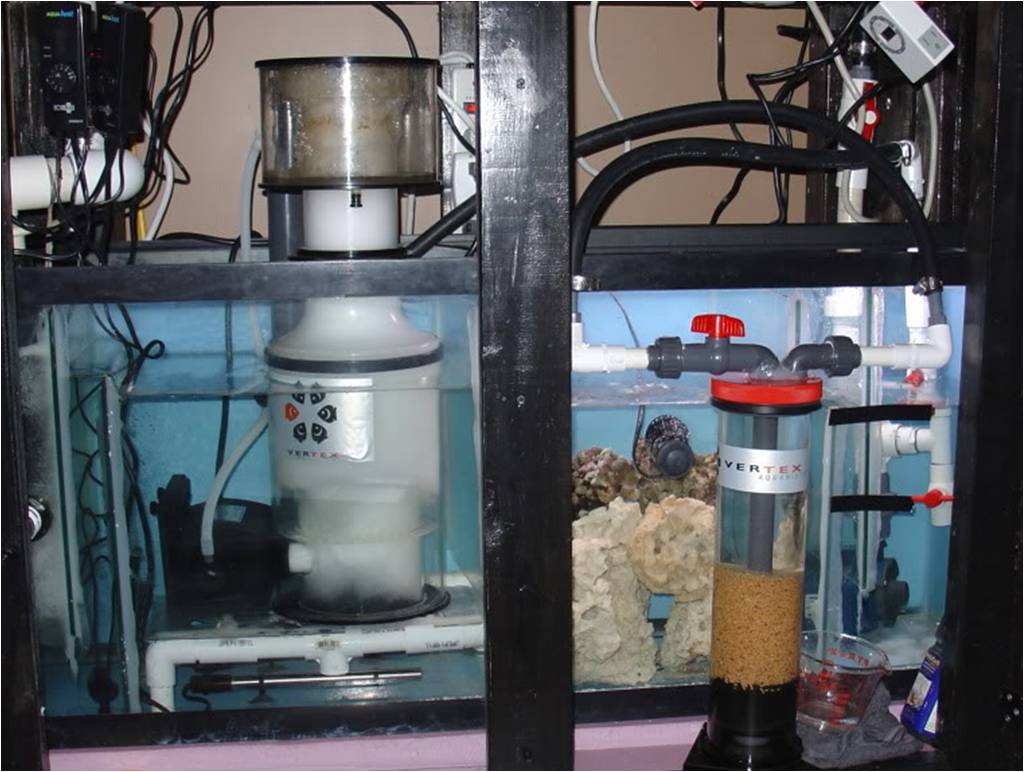
Here are some more pictures of the complete set-up
The Durso Stand Pipe and corner internal overflow

The drain line from the bulk head flange in the internal overflow to the first compartment of the sump. This is the live rock compartment.

The last two compartments of the sump and the plumbing return lines. The middle compartment is for the skimmer and heaters, and the last is for the return pump. I have one ball valve for the return pump, one for a media reactor, and a extra one should I choose to add something else in the future

And the final two pics of the return line coming out of the sump, unto the bulk-head flange at the back of the tank and the return nozzles in the tank.

It’s hard to see, but I did drill a small hole on the top of the last fitting just before the return line splits into two inside the tank. This way, if the return pump quits working the water will not drain below that fitting as the hole will prevent a siphon from being created.
And one full sump picture. I added 45 lbs of live rock and a filter sock to the live rock compartment, and a 1100 GPH power head for extra flow. I did end up moving the heaters in the live rock compartment just for ease of skimmer maintenance. You can see a part of my media reactor which just behind the center support for the stand. Keep in mind, all equipment power cords used on this set-up are plugged into a Ground Fault Interrupter (GFI) electrical outlet to help ensure electrical safety.

Some tips:
Missing fish ?
I almost lost a clown fish to my sump. The reason being is that I only had used egg crate as a guard to prevent fish from getting into the overflow box. Based on what I have read, many people in the hobby have experienced this. As the clown fish was about as wide as the opening in the egg crate, it was only a matter of time before he found his way into the overflow box and got sucked into the drain. I found the poor little guy in the skimmer compartment of the sump. That could have resulted in him getting hurt very bad or much worse. Every sense then I have nick-named him “Lucky”.
To prevent this from happening again, I placed a plastic mesh material over the egg crate.

And just a few examples of my 90 gallon as well. The biggest difference between the two is that I had made a small compartment for the intake to flow into to allow for a bubble trap to eliminate the micro bubbles before reaching the sump without using a filter sock.
The duriso stand pipe

The sump plan

The sump build
Note: the bulkhead flange with a fitting a valve that you see one the sump in the below pic was put there by the past owner of the tank. I did not use it for anything in the sump.
Sump pic 16
As you can see in the above and below pictures, there is a ball valve not currently being used (the one pointing down and attached to the return pump on the right). I placed this valve to help control the flow. I was concerned the return pump I used might have too much flow through the tank. If I ever want to reduce the flow into the tank created by the return pump, I just have to open that bottom valve and redirect some of the flow back into the sump. I prefer this approach instead of using a ball valve on the return line to control the flow through restricting the size of the line. I only use the ball value on the return line to prevent drain back when I remove the pump for routine maintenance.
And the completed sump in use

Please feel free to start a thread in the forum to ask any questions you may have. If you are not already a member, you will need to sign-up first.
http://www.aquaticcommunity.com/aquariumforum/forumdisplay.php?f=62
Some other good reading:
http://reefkeeping.com/issues/2008-01/newbie/index.php
Thanks for the detailed walkthrough.
I love this blog. It answered all my sump questions.
It’s like it knew what I was thinking…
That’s a smart answer to a tricky quseiton. Great information
this is not the same as max250. i have one but franclky sanyig i did not like it.the skimmer is not that efficient and not easy to be adjusted, noisy,the the water current is very strong. high water evaporation due to the cooling fans. there is not an opening to feed the fish you have to open the hood and every time you need to clean the glass from water drops.the curved edges very difficult to clean. i hope these problems will be looked into for the max500.
using a sump is a good option
City water has algie spoors, ciilca,copper, and many other items that will add up over time. My tank evaporates 2.5 gallons a day! thats 912 gallons a year that has to be topped off. The bad items in water stay in the tank an build up over time. If you use water that is not DI or RO you will kill alot of fish. Once in a while topping off with water out of the tap will not hurt but all of the time will cause you head achs. I buy my water and change it every 10 days 50 gallons at a time.
I have been talking with my local shop about slneilg the above set up and going bigger. What I am thinking is 4 215 gallon tanks in a loop. 3 of them will run into the 4 tank being a common sump. This way I can have 3 different types of environments, Reef, large critter, and a tank that will have non reef safe fish and critters that could not live with the large fish. 2 of the tank will be on top side by side the other 2 will be side by side below. one of the lower ones being the sump.
Very nice setup, if you cant afford rock, you can awayls add dead rock and as long as you have some live rock in there it’ll eventually be colonized and become live. Also don’t rule out taking from the ocean just because you have a mean temperature difference, I take stuff from the southern California coast with anywhere between a 20 to 30 degree F difference and much has survived.
I used blutac to make a 10mm high wall aounrd where the hole will b, and filled it with water b4 drilling. Then drilled in the puddle to help with cooling. I brought a 50mm diamond tipped hole saw from the local hardware shop. MUST BE DIAMOND TIP. Then on a low speed ( battery drill is good) and not too much pressure start drilling. Because the hole saw does not have a central guide drill bit it will move aounrd a bit before it beds.
very interesting ive leanrt alot since i am a begginer
I buy the water from the local shop then mix it at home in a 96 gallon plsitac yard waste can. I buy the salt by the case. If you buy it this way every 4th bag is free. If I average the cost of salt,water,Ph buffer and Vit and minerals cost, it comes out to $120 month. This is changing 50 gallons of water every 10 days. It is mostly a fish only tank and that is why I can get away with only changing the water every 10 days. What also helps is the amount of rock I have helps biologically clean
Hi, that’s a pretty cool sump tank esllaicepy the bio ball flow through chamber. I have a 6 foot which has 2 drains same way as yours is fitted except mine are higher up the wall. This severely restricts drainage and limits filtration. Better to have the hole higher up the tank at water level so the water drops straight down the pipe or have the pipe go up through the floor of the tank and straight into the sump.Cheers
Amr: if you will take a look at the pictures again you will see the drain lines run straight down through the bottom of the tanks. With the 1.5 inch drain lines, that will provide a unrestricted flow rate of around 1400 GPH after factoring in the effects of two elbows used near the end of the drain line.
It’s the return lines that are mounted higher up on the back of the tank.
I try that equation my tank is a 125 gallon it’s 72x18x24 when I did that math of (72x18x24)/231=134, is that equation for the actual volume or for how much water will drain back into the refugium when there is a power loss?
That formula in my example was really intended to be used on sump dimensions. I did not document that well enough.
If you want to use it to calculate the volume of an aquarium, you must use the inside dimensions for the formula to work. For example, your 125 gallon tank is made with 3/8” glass. When I round that up to ½ inch to make the math a whole lot easier, you now have a 71x17x23 inch dimensions which give you a volume of just over 120 gallons. If you use the actual dimensions it would almost bang-on accurate.
WONDERFUL INFORMATIONS ON MARINE AQUARIUM SUMP.
VERY USEFUL… THNX FOR SHARING
Hey I am just starting up marine and building my own stand and sump I am planning on using 3 separate tanks connected with pipes for my sump would there be any issues with this ?
It might not be the most effective way to set-up a sump, but it can be made to work
Excellent and thorough article. Thank you for sharing. I just added a sump to my 37 gallon tank. I just have equipment in there at this time. Skimmer, heater, auto top off.
It is odd for me to have a sump. I have fears for it to operate properly. Do you ever get over the fears for a leak or spill? The tank had been running without one so I am nervous.
It’s not odd to have a sump on a 37 gallon aquarium
If you are nervous about the sump npo working properly, you can test it to make sure everything will work as it should. Try unplugging the return pump for about 30 minutes and see what happens before plugging in the return pump again. If no water ends up on the floor and everything returns to normal after you plug in the return pump again, then you sump is properly set
If you do get water on the floor then there are things we can do to fix that
I did a practice run with it out in the backyard deck. I unplugged to power and nothing overflowed. Plugged it back in and it recoverd in about 30 seconds with no issue.
I guess I am just a nervous nelly. I would like to have a switch that would turn the pump off if the water got low in the return chamber. That happened when I was bringing it online and did not have enough water in the system. Uncountable amount if bubbled bombarded my tank. I felt like guilty of putting them through something they should have not had to go through.
I am not used to the splish splash. It was just the hum of my hob skimmer prior to the switch to the sump.
I only kept it off for a couple minutes though. Not 30.
You could try using a float switch connected to your return pump. If the water level gets too low, the switch will cut the power to the pump and not come back on until you reset the switch.
Hi,
Thanks for your sharing! It’s impressive.
I have questions about the heater. Why you put the heater in the skimmer tanks. If you adjust the heater with, for example, 76oF, what the exact temperature in tanks? If I want to keep all tanks with 76oF, should I put a heater for each tank? or I can you a water chiller? In that case where should I put the water chiller? Do you know about the heater that using logger to record temperature everyday?
Thanks for your time.
As the water flows through each compartment of the sump at a pretty good rate before being returned to the tank, it will not matter where you put the heaters. As long as your heater (or heaters) are powerful enough to heat the total volume of water in the set-up (main tank plus sump) then it will not matter were the heaters are placed. All of my set-ups have a very stable temp with this approach, never changing more than 0.3 F.
You can add a chiller to the set-up if you would like. It would be best to plumb a chiller into your return line or on a separate pump and line being fed from the last chamber of your sump.
Cliff,
Great guide! I am in the process of planning out a 120 gallon reef setup and I would like to use your guide as a basis for creating my own sump. The one thing that I cannot answer after reading your guide is how your fit the 55 gallon sump into your aquarium stand. If you use a standard 48″x13″x21″ 55 gallon tank, will it fit through one of the two doorways typically cut in on a standard 48″x24″x24″ aquarium stand (for a 120g tank)? Thanks!
If you double frame the ends, you can make a stand 51 inches long allowing the 55 gallon to fit inside the stand. That is how I built the stand for my 120 gallon with a 55 gallon sump. There are some pics in the below link that will help you better understand what I am trying to explain.
https://www.reefaquarium.com/2013/building-a-aquarium-stand/
Could you have gone with a 75-gallon (48x18x21) tank as a sump in your custom stand? Did you limit the width to 13″ in consideration for your media reactor? If you had the additional space that the 75-gallon provides, could you fit a skimmer and a reactor in the sump? Would you go the 75-gallon route to increase the overall water volume in the system?
Yes, I could used a 75 gallon, but I wanted to leave a little more room in the stand to work with. This way you will have better access to the sump when you want to add/remove anything as well as routine maintenance and cleaning. Yes, a 75 gallon can add more water to the overall volume, but that also depends on how big you size each compartment and how much room you need to leave for drain-back should the return pump fail
What size sump would you recommend for a 60 gallon beginner tank?
I would suggest a 40 or 55 gallon tank. This is based on two reasons, 1) this will allow you a good amount of space for any equipment you may want, and, 2) this will allow you to increase your total water volumn enough to see the true benifits of a bigger set-up.
Please can you tell me how and what those rocks are on the side of your overflow?
Are they real or fake and how are they fixed on? and where did you get them from?
Great step by step guide.
Thanks Michael
It was actually very simple to cover the overflow with rock. I cut some peaces of glass to the same size as the overflow. I took some dry base rock and broke it into small pcs. I used your basic dry ocean rock for this, nothing fancy. I attached the rock to these peaces of glass using aquarium safe silicone. Once the silicone was fully cured, I then attached these two peaces of glass with the rock on it to the glass overflow box using the same silicone. I let that fully cure before filling the aquarium with salt water. After about 6 months, the whole thing was covered in enough coralline to make the overflow box look like just another stack of rocks.
Why shouldn’t i use acrylic to make baffles on a glass tank?
The reason why you should not use acrylic and glass together in one sump is that silicone will not remain adhered to acrylic (it fails over time), and acrylic solvents will not adhere to glass at all. There is not aquarium safe adhesive or glue that will bond with both glass and acrylic.
Hi there,
First congrats on a thorough and well put together sump article !
In my red sea reefer sump, I keep the following: Ceramic media bags with lots of ceramic cylinders, Chaeto Algae with a good lighting, the heater, the Bubble Magus Skimmer, Activated carbon in bags, Seachem Matrix, a Plastic media reactor and a bag of Boyd Chemipure Elite.
I still see the Phospates value range between 0.025 and 0.25, Any advice on how to get this reach Zero? My Nitrates are always around zero and I do not have issues with that.
Almost forgot, 2 important pieces of info: Lots of Rock in the main display and I dose Red Sea NoxPox daily.
What advice can you provide me on the above? My reef is 60 Gal (Red Sea Reefer 250)
Thanks
There could be a few different thing going on here. I would first double check you test result reading. Maybe a freind or local fish store with a different brand of test kit could verify if you are getting accurate results. If the result are true, then there is a few options to consider and try the one you feel is best.
Biomedia such as ceramic media can often trap phosphates releasing them later back into the water. Assuming you have enough live rock to support the bio load of your tank you can slowly start to remove the ceramic media. However as live rock can also trap phosphates, the levels could be coming from your live rock. In that situation I would suggest extra water changes. In both of these situations, adding a phosphate media in a reactor will go a long way to help.
The third thing to look into is your water parameters. When they are off, most algae so will not use up as much phosphates as compared to nitrates. Make sure you have: 1.025 to 1.026 salinity, dKH of 8 to 9, calcium of 350 to 450ppm (and balanced with the alkalinity) 0ppm of ammonia and nitrites, temp around 78F, mag of 1100 to 1200 ppm, and a pH of around 8.2. Make sure you have good water movement and flow around your live rock as well
Hi!
My sump is starting to get green algae on the glass, should I leave it be or put some snails in there to clean it up a bit?
Algae in your sump can help you control nutrient levels in the water and help reduce algae in your display tank. If you don’t mind the look of it, I would suggest to leave it
If I am using the refugium to grow copepods, amiphipods, Mysis shrimp, etc… is it beneficial to put the protein skimmer before the Refugium? so that they can cycle up through the Display tank?
I would want these critters as a food source for my display tank.
Yes, before would be best. Otherwise, some of them will get sucked up into the skimmer
Cliff,
I noticed that you link to a fish tank calculator (http://reef.diesyst.com/volcalc/volcalc.html) on this page.
Would you consider updating that link to point to my fish tank calculator (www.landoffish.com/fish-tank-calculator/) instead?
Mine is much more user-friendly and can calculate the volume of several tank shapes, so I believe it would be more valuable to the people reading this article :)
Hi Cliff, I am planning to have 25gal saltwater tank and intend have some corals in the future when the tank is mature. I was told that a sump is the way to go. But having read some forums, there was concern of sump flooding. Is there a way to prevent sump flooding should the equipment fail? Power failure or pump failure?
Thanks?
If you do or do not get a sump can be a personal choice. I prefer sumps as it provides opportunities to hold/use more equipment, more rock, and will also add more water volume. However, you do not need a sump
Hi Cliff, thanks for the informative article. Really gained alot.
I am planning to upgrade to a 25gal saltwater tank and have read many reviews that sump is the way to go. I would not disagree to that but my only concern is the floodings that may occur due to equipment failures. Example: power failure or pump failure. Some have suggested getting a UPS to power up the system, but how about if the return pump just breaks down?
Is there a sure proof way to prevent flooding of the sump as in the case when family go on vacation and no one is around in the house.
Is a sump really necessary for a 25gal tank? I intend to keep bubble coral, frog spawn, hammers, mushrooms those relatively easy to take care kinds.
Appreciate your advise.
Thanks
Sump or no sump can be a choice of personal preference as you can have a great set-up either way
If you do put in a sump, you can make if overflow proof. By using well though out gravity drains and setting up the water levels in the sump low enough to hold all the drain back when the pump fails, you will never loose any water. I have a 8 year old set-up that goes through many power failures and weekly water changes (so I will turn off the pump) and have never lost any water yet. This article, combined with the plumbing basics article, will give you everything you need
Hey Cliff,
I am about to start building a 30 gallon sump for my 90 gallon aquarium and after reading your website I am not sure where the refugium should go. I am not sure what protein skimmer I will be using either. It was suggested that I go with the Reef Octopus Classic 150 INT. I am going to be housing mostly soft coral, maybe a piece or 2 of hard coral and a few fish. I am also looking for what dimensions I should cut my baffles to and whether I should go with glass or acrylic. This is a standard 30 gallon Aqueon tank.
Thanks.
You will not be able to successfully bond glass and acrylic together long term. If the tank is glass, stick with glass baffles
What a fantastic informative write-up. Thank you so much for spending the time to help other hobby enthusiasts!! I am a newbie and was intimidated by the thought of plumbing a sump and putting together a refugium, but after reading your information based on your experience, I was armed with enough information to reduce the fears and go forward with what I think will be the best solution for maintaining a stable system. Also I plan on propagating copepods for some finicky eaters, so thought the refugium was a great place for that. Thanks again. Your dedication to helping others is awesome.
Very Informative … Thank you.
I’m in the planning stages like many others. If you don’t mind I would love your opinion on a Centre Island Design and Sump.
Tank 72x18x24
Q1. My tank builder is suggesting a Central Island/Volcano Weir/Overflow as we the aquarium will be placed in the middle of two rooms and also be almost a divider between 2 hallways. It will be visible on all 4 sides. I am told 4 Plumbing holes will be drilled in the centrally in the base middle within a 400mm x 100mm island weir with comb overflow hiding the plumbing. We plan to hide Weir with small corals over time. The main query is, will flow be an issue and if so what options to assist flow are there?
Q2. Do you foresee any issues with a design of this ilk as I haven’t seen many/any before similar. Do you have any suggestions/tips regarding this design?
Q3. What size sump would you suggest. I am keen on a refugiam. Am I on the right track with a 48x14x18. Or am I better going 48x16x16 as it will have a little more ‘height space’ within the Cabinet. Cabinet is planned to be 600mm high.
Q4. Is it wise to have vents or something similar on the rear of the cabinet and in the door frames for airflow within the cabinet.
As mentioned previously, if you have any other tips/ideas or suggestions for central/island weir/overflow I am all ears :).
Thanks again for your insightful article above.
As for flow, it is just a matter of getting the correct amount of powerheads and in the correct position. You want to prevent dead spots
As for the sump, the bigger the better. Just make sure you leave enough room for equipment, there is ventilation, and you leave enough room in the sump for drainback in the event of a powerfailure
Some more helpful info below
https://www.reefaquarium.com/2012/the-importance-of-water-flow-and-movement-2/
https://www.reefaquarium.com/2012/aquarium-plumbing-basics/
Brilliant.
I’m planning to move up from a 12 gall nano cube (with 4 stage filter compartment at rear) to a 37 gall cube with sump.
Your article answered all the questions i had – and several I hadn’t thought of.
I am glad you found it helpful
awesome article! I am a newbie so please excuse my ignorance. I am starting with a 55 gal. tank that I will start as a FWLR and eventually build into a reef tank with corals. I have not drilled the tank and would rather avoid that. How would the piping connect from the sump and back without drilling without drilling either tank?
The below link has the instructions you are looking for
https://www.reefaquarium.com/2012/aquarium-plumbing-basics/
Hey, great blog. THANKS.
Question for you, how much pipe and head is too much in your opinion? Can I put the sump tank on the floor below (i.e. basement) and pump up to the tank in the living room above? What is the risk of extended piping adding micro-bubbles?
The idea is set up the sump on a bench about 5′ above the basement floor. The display tank sits atop a 3′ display +18 inches of tank (so the inlet is about 4’6 above the floor). So total pumping height would be about 7’6″.
This gives me lots of room for the mechanical, and chemical filtering, a RODI system, the refugium plus the chillers, heaters etc. Plus easy hookup to my water source and drain (no lugging buckets). Future growth will allow me to include a frag tank and isolation tank
I’ve only ever used the kit type tanks that come pre-plumbed all within the cabinet. I now have the opportunity to design and build my dream system and while I like the idea of the Red Sea Max or the Royal Exclusive Dream Box, I want to move away from the complete systems. Besides their cost is prohibitive and I can grow bit by bit this way if I plan it correctly + use much of the equipment I already own.
Not massive, but I’m probably looking at a 100 gallon (380 l) display tank and a sump of half to 3/4 of that.
thanks Jason.
Hi mate on your finished sump did you change the ends on which entry and return come from like did you change it to your overflow from the tank coming in through the filter sock into the chamber with the live rock
I am not too sure I understand your question
This article helped me so much with designing my sump. Thank you very much for taking the time to put this together.
hello, I’m planning to build sump for my 2 50gals, is it okay to add a UV Light?