Dealing with Nasty Marine Algae Break-outs
This article is about the nasty marine algae that can plague some people to the point of wanting to get out of the hobby. The good news here is that once you learn more about what most algae need, you can control them and prevent them from becoming a problem again. This doesn’t include any information about macro algae. Having a little bit of agae in you tank is not a bad thing, and (in my opinion) can give your aquarium a more natural look and feel. When the algae gets out of control is when we need to take steps to control it.
There is a common belief that a new tank will go through various stages of different nuisance marine algae as the tank cycles and then matures over the next 6 months to a year. In my opinion and experience, that is not completely accurate. Although there will likely be some small swings in some parameters as the tank matures, you don’t have to go through any excessive algae stages by properly planning your set-up and applying some preventative measures from the start. Some algae here and there is normal, but a lot of it is not. I will share some of my experiences (both the good and the bad) at the end of this article.
Some of the more common nasty algae types:
Diatoms:
Diatoms are commonly brownish or golden brown in color and seldom last longer than a month or two in a typical set-up with normal water quality. They can be very common in newer tanks as most new substrates can release silicates into the water which fuel the diatoms. In these cases, the diatoms are a temporary problem that will usually just away on their own once the silicates in the water have been consumed. If you have silicates in your tap water, you may be faced with an on-going diatom problem. They can also cover most surfaces in your tank from the rocks to the substrate.
The below pic some some golden (almost red) diatoms that I had got in my 90 gallon reef tank

Cyanobacteria (AKA Cyano )
This is another very common problem among hobbyist. Cyano is not actually an algae but a form of photosynthetic bacteria. It typically develops when the water quality is low and/or there is low flow in the tank. They are more commonly a shade or red in color but can develop in shades of green and/or blue like you would see in a fresh water aquarium. Cyano can look a lot like a red power forming on top of the substrate or structures in the tank in its earlier stages which will grow into a slimy looking structure most often with filaments forming on them as well. Even though it technically is not an algae, it still has the basic requirements of and algae in terms of nutrients and lighting. Cayno can grown on any surface of in your tank.
The below picture shows a spot of cyano that I had in my 120 gallon reef

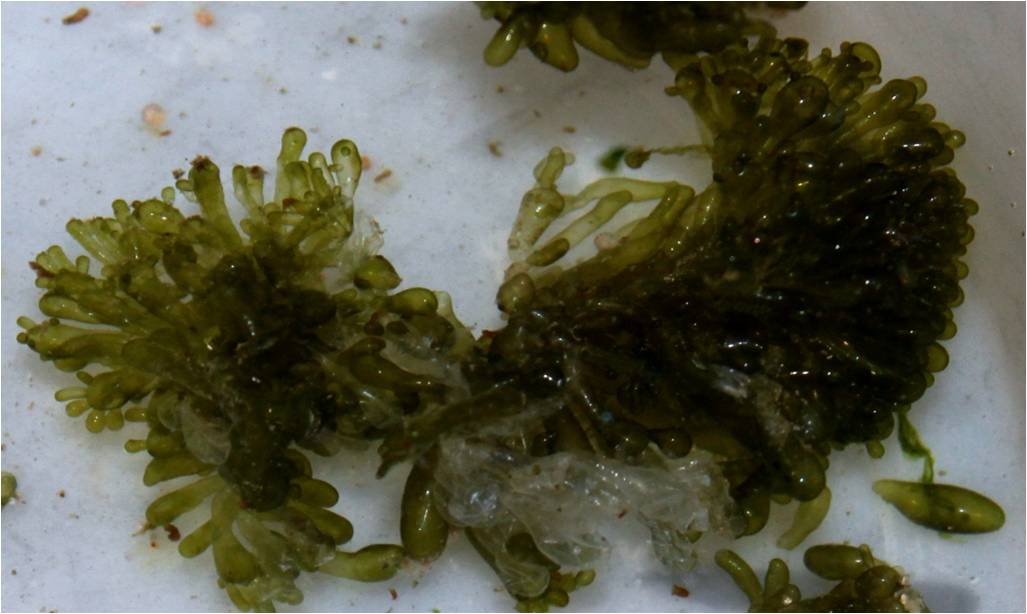
Dinoflangellates
They are among the hardest marine tank nuisance algae to properly identify. They range in color from: dark brown, to light green, to colorless. Most of the time they look like a stringy “snot” and will sometimes have what looks like to be bubbles on their surface. Dinoflangellates are also toxic to most tank inhabitants. Finding a large number of dead snails in a short period of time can be a sign that you have dinaoflangellates in your tank. Due to the toxins, more frequent water changes, manual cleaning, and lots of carbon are recommended in addition to the described control measures in the below sections. Dinaoflangellates can grown on any surface of in your tank.
The below picture is the Dinoflangellates a friend of mine had in her tank. It’s green-ish in color. The picture is not the best quality, but this should give you a idea of what to watch for.

Hair Algae
This is among the more common problem algaes. It is easy to recognize as it starts to look like a few short and fine little hairs light green to dark green in color. As it spreads, the hairs form a thick carpet and will grow longer. It will grow like a tuff of grass. This can be a really fast growing algae. Most fish and inverts will not eat hair algae once it starts to grow in length. It will commonly grow on your rocks.
Valonia , (AKA Bubble Algae)
There are a few different types of bubble algae, each one forming a slightly different shaped bubble. Although the size and shade of green of the bubble may vary, you cannot mistake bubble algae for any other type of algae. There will not be any other parts to this algae, only green little bubbles. It will start as one green bubble sitting in your tank. A single standalone bubble ranging in size from a marble to a small ball about ¼ the size of a marble. Within a few days to a week, there will be a few more bubbles, in a few more days there will be some more bubbles, and so on and so on. Inside those bubbles are thousands of spores. If you break open one of those bubbles, the spores will be released and you could have a pretty big outbreak on your hands. . If you can carefully and manually remove these bubbles as you see them, you will never have a serious problem. Bubble algae will grow best on your rocks.
Below is a picture of the bubble algae (Valonia aegagropila to be exact) that I had growing inside the internal overflow in my 90 gallon reef tank.


Bryopsis algae
This algae can be mistaken for hair algae as it begins to grow. As it grows it starts to look more and more like a fern then hair algae. As with the hair algae, you clean up crew won’t touch this stuff once if grows very long. Bryopises will typically be found growing on your rocks and will be a shade of green in color.
Caulerpa
This is a green-ish algae with runners and stems that have an almost leaf like looking structure on top of the stems. Sometimes this leaf like structures can look more like ferns rather than leaves making it easy to confuse with Bryopsis at times. This is a very fast growing algae that can reproduce sexually as well as asexually through sending out runners. You can also find red Caulerpa but that is not as common as the normal green variety. It will usually grow on your rocks
Grape Caulerpa
This species of Caulerpa is a lot like the already mentioned cualerpa with the exception of the grape shaped like structures instead of leaf like structures.
Coraline algae.
This is not a nuisance algae, but a algae that thrives and grows in good water conditions. I will grow on almost any surface in your tank (except the substrate). Once you start seeing coralline algae in your tank, you will know that your tank is starting to mature and your water quality is good.
These are some general descriptions of some of the most common nuisance algaes that you can find growing in your tank. The below websites listed at the end of this article can help you identify which type of algae you are dealing with. I did not spend a lot of time focusing on trying to identify the type of algae as (for the most part) many of the control and preventative measures can work for multiple algae types.
Control Measures:
As with all algaes, it can be about the lighting, nutrients in the water, and flow. The lighting period should be shorter and within the correct color spectrum. Whenever your nitrate or phosphates rise above the levels typically found in natural sea water, you are at risk of algae. Once of the best and quickest way to eliminate this is through more water changes followed by utilizing as many of the actions as you can which are described as preventative measures.
Lower flow tanks can be susceptible to more algae as compared with tanks that have good/stronger flow. Some algaes like dinos and cyano will not thrive in high flow set-ups. By maintaining higher flow you will also be keeping any detritus to remain floating in the water were your mechanical filtration (like a skimmer) can remove it from the water before the detritus has a chance to break down into nitrate and/ or phosphates. This can be a balancing act between the flow requirements of your tank inhabitants and helping to get rid of algae.
Manual removal can also be a good method to help you work through the problem and buy you time to find out what is causing the problem in the first place. This also will help when used in combination of one or more of the below listed actions. It may not be fun, but when used with other measures, this can be an effective short term solution to help you get ahead of the algae growth.
Just a quick note on using algaecides. I recommend you do not use them for two reasons. Although I must admit here that I have no personal experience with them, but I have looked into using them before. Based on what I had researched, they can be an indesiminat poison under the correct conditions. That is, under the right conditions, algaecides can also affect your tank inhabitants. The second and most important reason why I don’t recommended using algaecides is that algaecides only get rid of the algae. The underlying cause that created the right conditions for the algae to thrive still remains which means the algae will be coming back in time.
Preventative Measures
These actions will not only help you to prevent algae, but it can also help you get rid of a bad algae problem as well. At times it came be an educated guess when trying a few of the below listed actions before finding what works well for your set-up. Most times it will be combination of many things that will get you results. In my experience there is no silver bullet when it comes to preventing or controlling algae. I personally try to incorporate as many of the below actions as possible. So far that approach has been working out pretty good for me.
1) Curing Live and Dry Rock. Live rock, when exposed to higher levels of nitrates and/or phosphates, will absorb them like a dry sponge will soak up water. This will also happen with the rock is exposed to lower levels of these nutrients over a longer period of time. If you reduce the nutrient levels in the water from what they have normally been, the nitrate and phosphates absorbed into the rock will now start to leach out of the rock raising the nutrient levels again. Even if this rock becomes dead, the nitrates and/or phosphates will remain in the rock. All rock, both live and dead, should be cured before being added to your set-up. The below link explains the process
http://www.aquaticcommunity.com/aquariumforum/showthread.php?t=76703
2) Properly Maintaining the Substrate. Just like with your live rock, live sand can also trap nutrients and leach them out into the water. Certain fish and inverts can keep the substrate moving to help prevent this. Any detritus build up on the substrate should be removed by a gentle gravel vac to both pick up the detritus and stir the substrate to help prevent the buildup of any nitrates or phosphates. This could also be a symptom of not enough flow. Many people with reef tanks are now setting up there tanks without any substrate at all.
3) Good Water Quality. In my experience this is one of the most effective ways to help avoid nuisance algae growth. Not only is it important to keep your nitrate and phosphates levels as close to zero as possible, it is also important to maintain all of your parameters and keep them stable. Changes in you parameters can also allow algae to take hold in your tank. The below link talks about a few of the critical ones that can be the most impactful.
https://reefaquarium.com/2012/ph-in-marine-aquariums/
4) Your Equipment Choices and set-up decisions that you may will also help you to avoid water quality problems. As a general rule of thumb, lots of good quality live rock, good flow, and a good quality skimmer rated for more water than your set-up has, will all help you maintain your water quality in-line.
5) Correct Flow. This is an element that is more impactful on some algae and less on others. Generally speaking, more is better. Not only will it help the live rock to efficiently act as the biological filtration, it will also help to keep any detritus floating in the water were your mechanical filtration (like a skimmer) can remove it from the water before the detritus has a chance to break down into nitrate and/ or phosphates.
6) Good Tank Maintenance Routine. In addition to making sure the substrate is clean, weekly water changes will also help to keep the nutrients from building up slowly over time. A good twice weekly cleaning of any filters that you are using will also go a long way to help prevent
7) Maintaining an Proper Clean Up Crew (CUC). All systems, regardless of how well you maintain the lighting and nutrients, will have at least s very very small amount of algae somewhere. Having tank inhabitants that eat algae before it can becomes a problem is almost always a good idea. The below chart will give you a few ideas about that.


The above chart is based from one I found at fishchannel.com
NOTE: you still have to make sure that any fish you invert you add to your tank, is suited to your set-up and your current inhabitants.
8) Maintain Proper Lighting. For most set-ups, this involves a photo period of around 8 to 9 hours and more of the bluer color tones. Actinic lighting will provide algae with the least amount of useable light. Warmer colors starting at 8,000 to 7,000 K (and decreasing from there) will help almost all types of marine algae to grow. Replacing bulbs when needed will help to prevent algae. You have to carefully limit the amount of usable light to the algae while still providing enough light to corals or anemones (if you have any in your tank). It can be a delicate balancing act learned through trial and error.
9) Using RO or RO/DI Water. Many residential water supplies will often have a small amount of nitrates or phosphates along with other dissolved solids in the water. While these levels are harmless to people, they will provide algae with a food source. Using water from a RO or RO/DI unit will not have any: nitrates, phosphates, or other dissolved solids which will eliminate one potential food source for algae. The below link can help you better understand how RO and RO/DI units work.
https://reefaquarium.com/2012/rodi-units/
10) Good Quality Salt Mixes. Some lower quality salt mixes can contain some phosphates and/or nitrates within the salt mix. You don’t need to use the best salt mix available on the market, just a good quality one. If you not too sure of the quality of your salt mix, test some newly mixed salt water before adding it to your tank.
11) Chemical Filtration. This can help removing or limiting some of the food source. Using a media reactor or HOB filter with phosphate removers will help prevent algae by removing phosphates preventing their build-up. There are also nitrate reactors that can be used to accomplish the same goal with your nitrates. Large quantities of good quality live rock will also help to provide more surface areas for nitrifying bacteria to grow and consume the more of the nitrate in the water. There are also certain chemical filter medias that will remove silicates from the water helping to prevent diatoms in newly set-up tanks, or when your water supply has silicates in it.
12) Carbon Dosing. Carbon dosing can be a good preventative measure as well as an effective method to remove nitrates in the shorter term. Essentially, you are adding a carbon source to your water to promote the growth of free floating bacteria that will consume the nitrates in the water. As these bacteria consumes the nitrates, your skimmer will then remove the bacteria from the water (before it gets a chance to settle on something) which also removes the nitrates contained inside the bacteria. If you don’t remove the bacteria with a skimmer, the nitrates will be released when the bacteria dies off as a part of its normal life cycle. This of course is just my layman’s explanation of carbon dosing. This is a subject that is best discussed as its own topic as it truly deserves more than just a paragraph.
13) Dosing Bacteria Cultures / Spores I have read about one method that other hobbyist have used to combat cyano and dinaoflangellates which is starting to gain popularity. It based on the fact that both cyano and dinoflangellates are forms of bacteria. This method involves dosing cycling products (following the manufactures recommend dosing instructions) that contains both nitrifying and de nitrifying bacteria cultures and spores in them. The theory is these cycling products will outcompete the cyano and/or dinaoflangellates for resources. There are examples available in many on-line forums of hobbyists successfully using this approach, followed by claims that the cyano and/or dinoflangellates did not return after the treatment cycle was completed. I have also read about this method be successfully combined with carbon dosing as well.
This method will not help with your typical algae. I have no personal experience with this method so I cannot offer much more details than what I have read. If you choose to try this method to deal with cyano and/or dinaoflanellates, please research the topic first to understand the pros and cons before starting
Just a quick word about testing your nitrates and phosphates
As always, I recommend a good quality test kit. However, in some cases, even using the best test kit on the market will give you readings that are lower than the actual amount in a tank that has a bad algae problem. The reason being is that the algae are using up the nutrient almost as they are being produced. Even though your test kit says o, you algae could be consuming too fast for you to get a water sample containing any nutrients in it
Some of my personal experience
My 90 gallon set-up was the first marine set-up that I have and was the one that I learned the most from. Based on all of the learning/researching that I completed before setting up the tank. I did incorporate almost all the above listed preventative measure into the set-up before adding my first tank inhabitants.
The only thing I did not complete is curing the live rock before adding it to the tank. Originally I had though as I was going to cure the rock in the tank and, this live rock was newly harvested from the ocean, I should not have to worry about any nutrients leaching out of the rock latter on. In my opinion got lucky that time. I now will cure ALL rock (both live and dry) that I add to any of my set-ups before putting the rock in there. The current CUC consists of: 1 dwarf flame angel, 1 starry blenny, 1 yellow mimic tang, 1 conch snail, and between 8 and 12 snails
Parameters: Temperature between 78 and 79F, Salinity between 1.025 and 1.026, 0ppm for ammonia and nitrites, PH between 8.1 and 8.2, a little less than 1 ppm nitrates, Calcium between 430 and 440ppm, alkalinity (dKH) between 9.6 and 9.8, magnesium between 1,300 and 1,350ppm, and phosphates to do not register on my test kit,
This is a picture of my 90 gallon reef tank just after I added the un-cured live rock. I latter moved the live rock into the sump.

This is the same tank 2 months after the cycle was complete and I started adding fish and some hardy corals. The tank had a slight diatom outbreak, but it only last 2 or 3 weeks.

Below is the same tank 6months aftercycling the tank

And the same 90 gallon tank 11 months after it was cycled. The current CUC will handle any algae that pops up. The only every noticeable algae that I will get in this tank is inside the internal overflow were the CUC can not get to it.

I have experience minor problems with my 120 gallon tank, mostly due to lower flow spots in the tank. In the case of this set-up, how I laid out the rock in the tank caused some problems by creating dead-spots. Once I started to see some cyan developing in these spots, I increased the flow and make a lot of adjustments to the direction of the flow. Even after all of those improvement I get a little cyano every once in a while that can be quickly dealt with during a gravel vac. It’s a choice I made to prevent any changes to how I stacked the rock (balancing the algae prevention with the look I wanted). I had to clean up some cyano with every weekly water change for a while after that. But if I had to guess the true cause of the occasional cyano is that I have a tendency to overfeed sometimes. So far I’ve been able to avoid the cyano coming abck buy adjusting the amount I feed the tank.
I also once had a small patch of what I thought was Dinoflangellates and quickly cleaned it off. It came back twice after that, but I have seen any of it since then. Once again, I believe the cause was a little overfeeding.
The second biggest lesson learn with this set-up was the benefits of curing (or re-curing) your live and dry rock before adding it to your tank. I had leached out a lot of nitrates and phosphates from both during the process and before adding it to the tank. I believe I could have been headed for trouble if I had not done that.
Current CUC consists of: one hippo tang, 2 conch snails and 18 snails.
Parameters: Temperature between 78 and 79F, Salinity between 1.025 and 1.026, 0ppm for ammonia and nitrites, PH between 8.1 and 8.2, nitrates are a little above 1 ppm, Calcium between 430 and 440ppm, alkalinity (dKH) between 9.6 and 9.8, magnesium between 1,300 and 1,350ppm, and phosphates around 0.2 ppm.
The below pics are of my 120 gallon reef about 2 months after it was cycled.


The same 120 about 6 months after the tank was cycled

And the same tank 11 months after being cycled

Below are the references that really helped me learn along the way as well as putting this article together.
http://www.saltcorner.com/AquariumLibrary/browsesection.php
http://www.manhattanreefs.com/forum/reefs-beginners/46961-cyanobacteria-primer.html
http://www.melevsreef.com/id/algae.html
http://www.fishchannel.com/fish-health/saltwater-conditions/aquarium-marine-algae.aspx
http://www.reefkeeping.com/issues/2002-02/hcj/feature/
http://reefkeeping.com/issues/2008-07/nftt/index.php
http://reefkeeping.com/issues/2006-11/rhf/index.php
http://reefkeeping.com/issues/2004-05/nftt/index.php
Baensch Marine Atlas, Volume 1, Hans A, Baensch
Please feel free to start a thread in the forum to ask any questions you may have. If you are not already a member, you will need to sign-up first.
http://www.aquaticcommunity.com/aquariumforum/forumdisplay.php?f=62
This is exaclty what I was looking for. Thanks for writing!
I¡¦ve recently started a blog, the information you offer on this site has helped me greatly. Thanks for all of your time & work.
I just start my new 90 gallons system and I see rhe first sing of algae thanks for the advice .
I can’t get rid of algae and am doing lots of water change but am seeing that tap water is not so good if I use Ac water is it good?
Depending on the quality of your tap water, using reverse osmosis can have a very big impact on reducing algae provided your other parameters are in line and you are not overfeeding.
I’ve been needing help with some kind of algae issue that’s been going for awhile now. I’m guessing it detritus not 100% sure my sand bed is brown and I cannot get to be a nice white looking sand. I’ve done everything I can think of it will not go away. I use Rodi for everything in my tank, I’ve replaced the filters a few months ago. I decreased my feedings to twice a week nothing. I now have anthias so I have to feed twice a day LRS reef frenzy. I run a BRS gfo and carbon reactor. Reef dynamic ins 135 skimmer, have bridge lux leds, also have 2 jebao wp40 power heads. I’ve reduced my led time on, Ive vacuumed the sand nothing seems to help. I’m not for sure if it’s detritus but it is brown and I only can see in on the sand and I don’t have any other algae issues besides one tiny spot in which it has barley grown in the past year. If you have any advice please let me know thanks.
I would like to ask a few questions to better understand what is going on with your set-up
-How long has the set-up been running ?
-What size is your display tank ?
-What all do you have for fish and corals in your tank ?
-What is your weekly maintenance routine like ?
-Are you using live rock for biological filtration or are you using a filter ?
-how long is your tank lighting on for ?
-What are your current water parameters for: nitrates, phosphates, alkalinity, calcium, and magnesium ?
1)My tank has been set up for a little over a year 13 to 14 months. I used the rock out of my 55 which was over crowed in rock I had close to 75 lbs. In it. I bought extra rock from Marco rocks (dry ). I also used dry sand.
2) 125 gallons 72x18x22
3) fish
2 percula clowns,
1 black ice clown,
3 lyretail anthias
Coral all small colonies
Toadstool (5in)
Hairy mushroom
Ric mushroom
Assorted Zoas
Acan
Duncan
5 ) weekly routines
Clean skimmer cup and neck
Change filter sock
5% water change
Scape glass
And I siphon the top layer of sand bc it looks so bad.
Monthly change the gfo and carbon
6) I guess I’m using both. I have about 105 to 110 lbs of live rock and mechanical filters (reactor, skimmmer, filter sock)
7) I have 3 -120 watt bridge lux led fixtures
Hrs: white 10000-14000k: 6:30 hrs
Blue 450nm: 10:00 hr
Moon lights: 4:00 hr
8) parameters
Nitrates:
Api: 0.0
Phosphates:
Hanna checker readings: 0.0
Alakinity:
Api: 10 dkh
Calcium:
Api: 380
Magnesium:
Don’t have a test kit
I also use instant ocean salt. And feed my tank LRS reef frenzy which contains multiple different types of foods and different sizes to feed everything.
Try keeping your alkalinity the same, but raising your calcium to 430ppm and increasing your magnesium to around 1500ppm.
So I need to get a magnesium test kit. How do you recommend I bring my calcium up. And should I keep the salt I have or change it? I use instant ocean.
Find yourself a good quality calcium additive for marine aquariums. You can switch to a better salt if you want, but I do not believe that will result in long-term gains
I scrubbed algae off my rock and 5 of my tangs died. It is a well established tank and I have had the fish for over a year, maybe close to two years. Any idea why?
When you cleaned off the algae, you removed a part of the tanks ability to process ammonia and other wastes too fast for your bacteria to grow and keep up. Check your water parameters to verify
great to be here